
Streamlining Your Lightroom Workflow: Efficient Techniques for Consistent Results
Neurapix
Apr 24, 2025

Photographers today face an ever-growing volume of images to manage—whether it’s a full-day wedding, a weeklong tournament, or a corporate event with multiple team portraits. Sorting, editing, and delivering hundreds or even thousands of photos can quickly become overwhelming if your workflow isn’t well-structured.
That’s where a streamlined Lightroom workflow becomes not just helpful, but essential. Efficient Lightroom photo editing isn’t about cutting corners—it’s about creating a consistent, high-quality output while reclaiming valuable time. When your workflow is organized and repeatable, you reduce stress, avoid burnout, and maintain the artistic control that defines your brand.
This article walks you through practical, professional techniques for managing large-scale edits efficiently. From organizing and culling your photos to leveraging Lightroom’s performance settings and automation features, we’ll show you how to get the most out of your photo editing sessions—so you can spend more time shooting and less time stuck behind the screen.
Preparation: Organizing and Culling Your Photos
Before making your first adjustment, the most impactful way to speed up Lightroom editing is to start with a clean, focused batch of your best images. That means culling—the process of selecting the keepers and weeding out the rest.
There are several ways to approach culling, depending on your preference and tools:
In Lightroom Classic: Use the Library module to quickly flag images (P to pick, X to reject) or assign star ratings (1–5) and color labels. Enable Auto-Advance (more on that later) so each rating automatically jumps you to the next image.
Using External Tools: Many photographers swear by tools like Photo Mechanic, which allow ultra-fast culling based on embedded JPEG previews before importing into Lightroom. This is ideal if you shoot high volumes and want to avoid waiting for RAW files to load during culling.
Whichever method you choose, the goal is the same: narrow your focus to only the photos to edit in Lightroom that are worth your time and energy.
Smarter Imports
When importing into Lightroom Classic, use the Embedded & Sidecar Preview option. This speeds up initial browsing and makes culling smoother because Lightroom displays the camera’s embedded JPEG preview instantly, without generating new ones on import.
You can also apply metadata, keywords, and even Develop presets during import—more on that in a moment. Every step you optimize during import saves time later.
Touching on Free Options
If you’re still exploring Lightroom and looking for a free Adobe Lightroom option, note that while Adobe offers a limited free mobile version and a free trial of the desktop software, the full version of Lightroom (Classic or CC) is subscription-based. However, if editing is a core part of your business, the time saved and quality gained with Lightroom’s professional tools make it well worth the investment.
Leveraging Collections and Albums
Once you've imported and culled your best images, the next step in creating an efficient Lightroom workflow is organizing your photos into manageable groups. Lightroom offers two key features to help with this: Collections in Lightroom Classic and Albums in Lightroom CC. Both serve the same essential function—keeping your edits organized and easy to manage.
Using Collections in Lightroom Classic
Collections are virtual groupings of photos that can span across folders or shoots. Unlike folders, they don’t move your files—they simply reference them, making it easy to build logical groupings without affecting your file structure.
Here’s how to set them up:
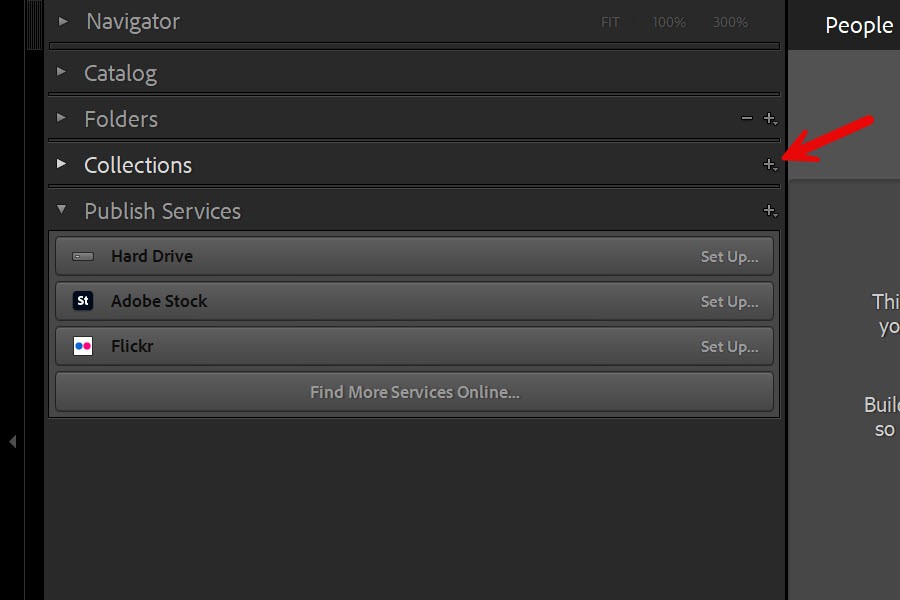
In the Library module, go to the Collections panel and click the + icon to create a new Collection.
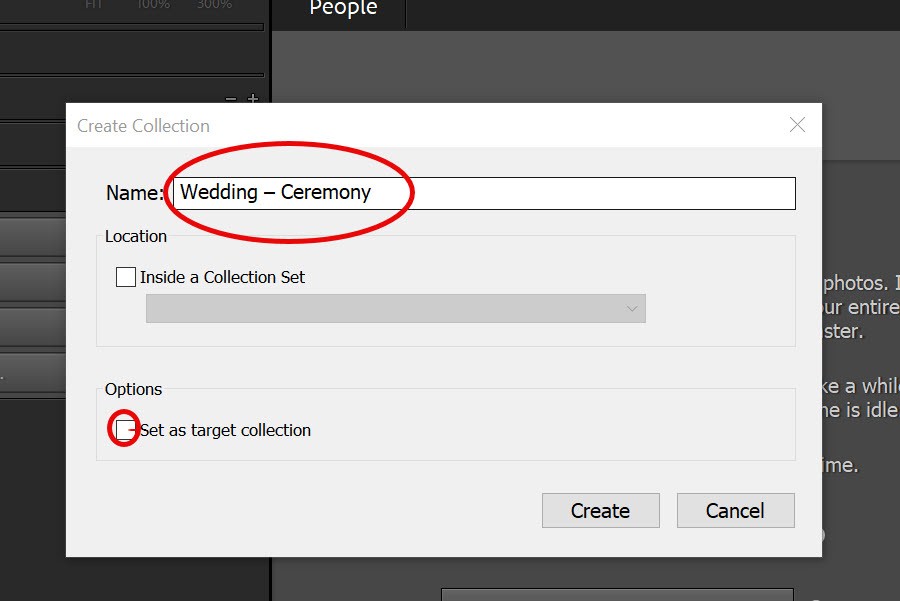
Name your Collection (e.g., “Wedding – Ceremony”, “Business Headshots – March 2025”).
Choose whether to include selected photos, set as target collection, or sync with Lightroom CC.
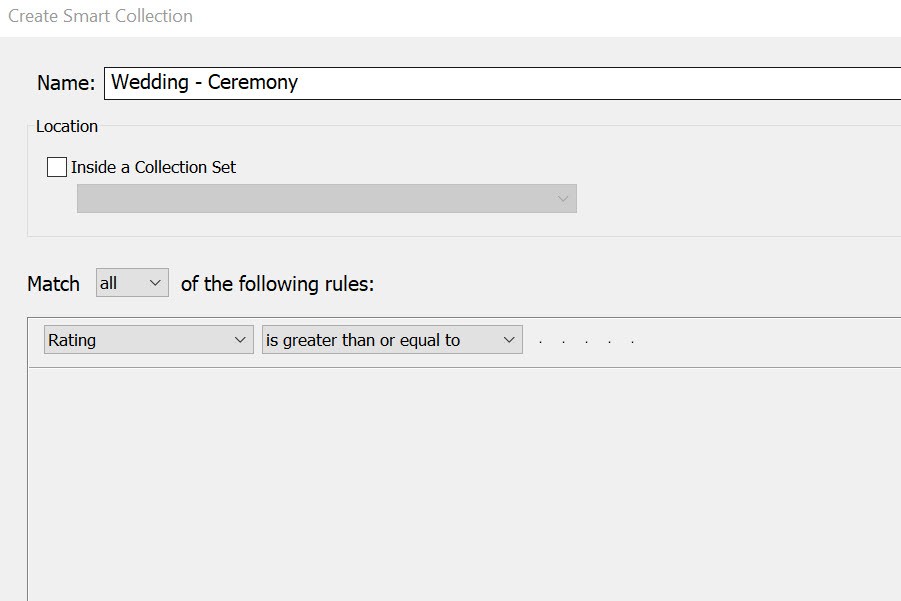
Drag photos into the Collection manually, or create Smart Collections that automatically populate based on rules (e.g., star rating, keywords, or date).
Collections are incredibly useful for segmenting large jobs. For instance, a wedding might have separate Collections for “Getting Ready”, “Ceremony”, “Reception”, and “Portraits”. This helps you tackle edits in focused batches, apply specific presets per scene, and maintain consistency across each segment.
Using Albums in Lightroom CC
In Lightroom CC, the equivalent feature is Albums. These function similarly to Collections but are tightly integrated into the cloud-based ecosystem. Albums sync across devices and are ideal for photographers who edit on both desktop and mobile.
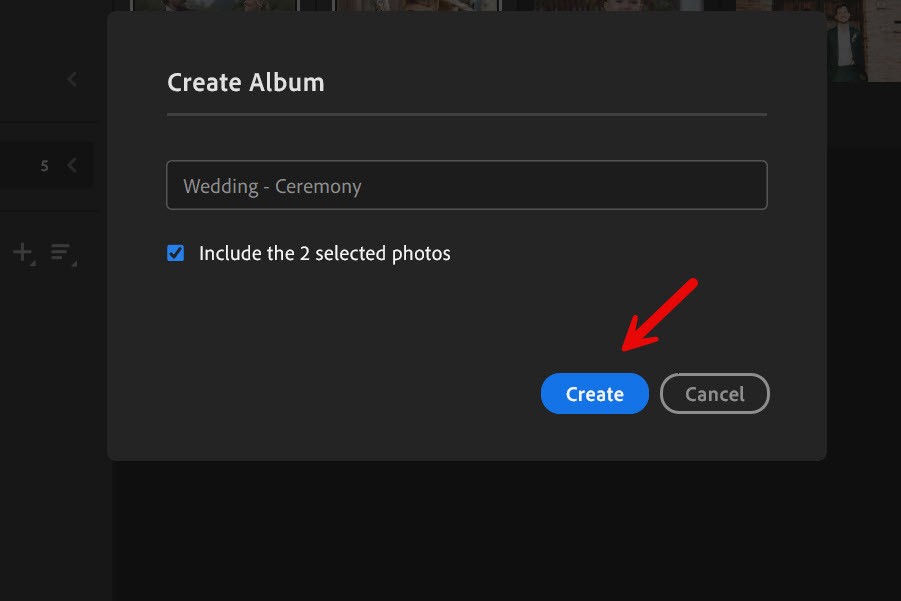
To create an Album:
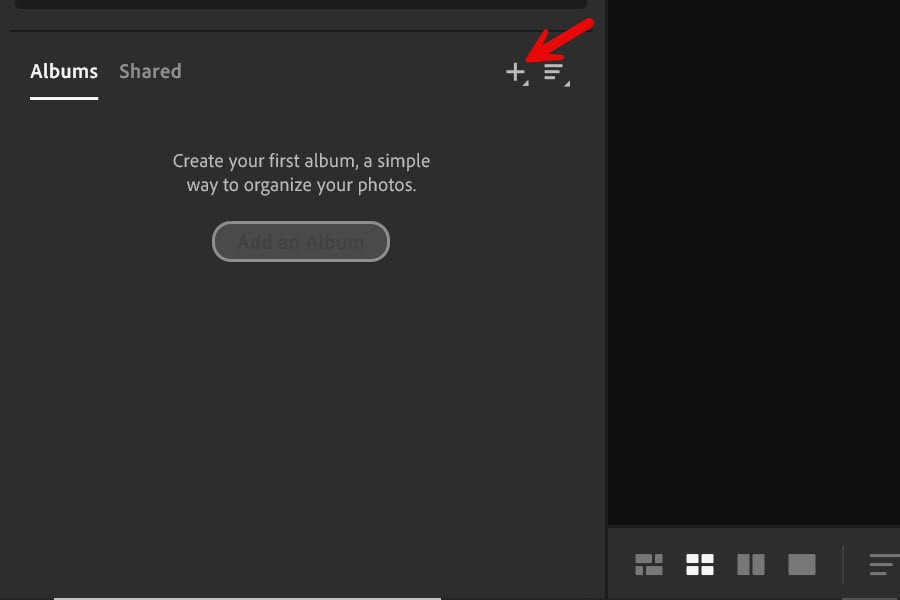
Click the Albums panel on the left.
Use the + to create a new Album and name it accordingly.
Drag and drop your images into the Album from the All Photos view.
Albums in Lightroom CC make it easy to manage projects on the go and collaborate with clients or teammates—especially if you’re using shared Libraries or cloud-based collaboration tools.
Why Grouping Matters for Workflow
By using Collections or Albums in Lightroom, you can streamline your editing workflow in several key ways. They give you faster access to relevant images without the need to dig through multiple folders. Batch edits become simpler, as you can easily apply presets or synced adjustments to all photos within a group—like ceremony shots taken under the same lighting conditions.
Exporting is more efficient too, since you can export by Collection for deliveries, proofs, or album layouts. Plus, synced Collections or Albums make client-proofing easy by allowing you to share curated online galleries directly.
Presets on Import and Auto-Advance Workflow
You’ve culled your images and organized them into groups—now it’s time to start editing. One of the best ways to speed up your workflow is to let Lightroom do some of the work before you even start editing.
Apply Presets Automatically on Import
In Lightroom Classic, you can apply a Develop Preset as part of the import process. This gives every image a consistent starting point—ideal for branding, white balance corrections, or stylistic base looks.
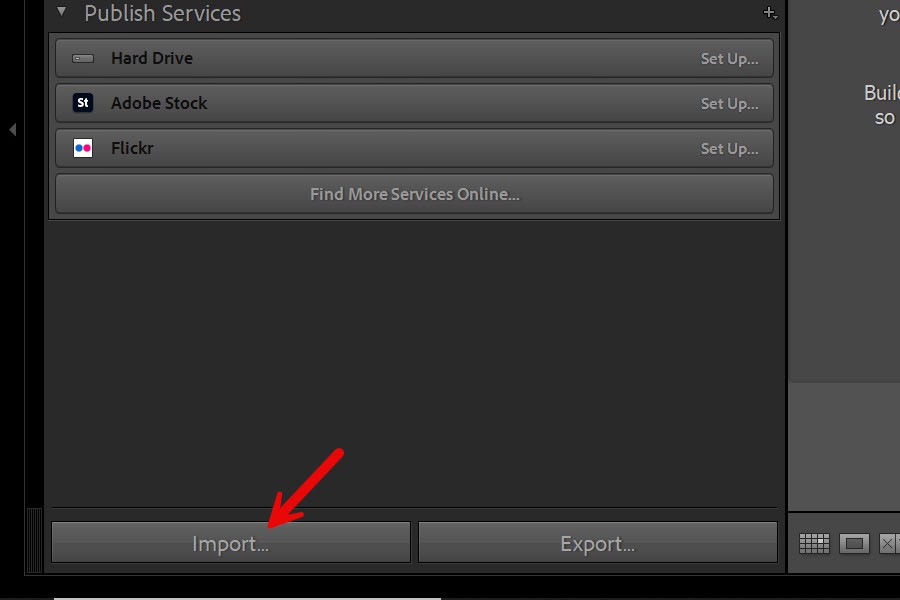
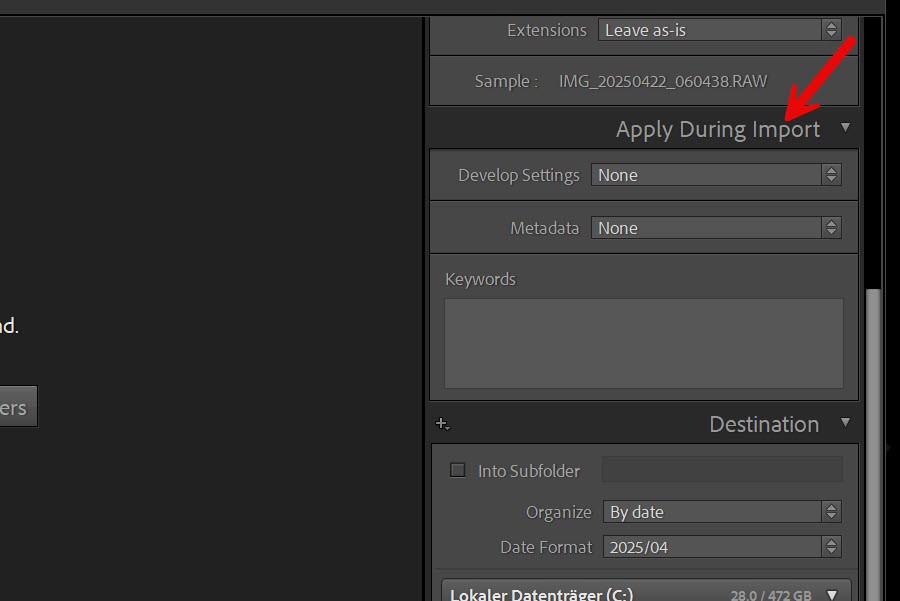
To apply a preset on import:
In the Import dialog, go to the right-hand panel.
Under Apply During Import, choose your preferred Develop Preset (for example, one with lens corrections, chromatic aberration removal, and a base tone curve).
Save this as part of an Import Preset for future sessions.
This is especially useful for maintaining consistency across jobs. For example, you might apply a bright, neutral preset for business portraits, or a warm, airy look for engagement shoots. Applying a preset on import means you start every Lightroom photo editing session with images already halfway there.
Use Auto-Advance and Keyboard Shortcuts
Another workflow booster is Auto-Advance, a setting that automatically moves to the next image when you apply a rating, pick flag, or rejection. It’s a small change that makes a big difference when reviewing or culling dozens or hundreds of images.
To enable it:
In Lightroom Classic, go to Photo > Auto Advance, or simply press Caps Lock. Combine Auto-Advance with keyboard shortcuts:
1–5 for star ratings
P/X/U for Pick, Reject, or Unflag
R to crop
Q to spot heal
D to jump to Develop mode
This transforms your culling and editing sessions into a fluid, uninterrupted rhythm—ideal for Lightroom photo workflows where speed and precision matter.
Using AI wisely – without losing your style
If you’re looking to reduce your editing time even further, intelligent automation can be a valuable addition. Tools like Neurapix use AI-powered editing profiles that adapt to your personal style—ideal for processing large batches with consistent quality while still maintaining full creative control. Especially when working with recurring subjects or similar lighting conditions, this approach can save you significant time that you can invest in other parts of your workflow.
Optimize Performance Keep Catalog Clean
Even the most efficient editing habits can be slowed down if Lightroom itself isn’t running smoothly. Fortunately, there are several ways to improve performance and keep your catalog fast and responsive—especially when working with high-resolution RAW files or large volumes of images.
If Lightroom feels sluggish, a few targeted settings can make a big difference. First, enable GPU acceleration via Edit > Preferences > Performance (or Lightroom > Preferences on Mac) to take advantage of your graphics card—especially helpful for speeding up newer features like AI masking.
Under the same tab, increase the Camera Raw Cache size to at least 10–20 GB, which improves image loading, especially in the Develop module.

Working with Smart Previews can also dramatically improve responsiveness. These smaller versions of your photos allow for faster editing without loading the full-resolution files. You can generate them on import or later via Library > Previews > Build Smart Previews. Additionally, make sure to store your catalog and current working files on a fast SSD.
Once a project is complete, you can move it to a slower external drive to free up space and keep your workflow snappy.
Keeping your Lightroom catalog clean and maintained is just as important as system settings. Regularly run File > Optimize Catalog to improve database performance. When editing in the Develop module, consider building 1:1 Previews in advance (Library > Previews > Build 1:1 Previews) to eliminate delays while working.
If your catalog grows too large—typically beyond several hundred thousand images—it’s wise to archive older projects separately. Many professionals work with one catalog per year or per client type to keep things manageable. Lastly, avoid overusing Stacks or Virtual Copies. While useful, too many can clutter your workspace and slow things down. Use them with intention and remove unused copies when finished.
Ultimately, a smooth Lightroom experience depends not only on editing technique but on how well you manage the software environment. A bit of attention to system optimization and catalog hygiene can save you hours in the long run—and turn Lightroom back into the fast, reliable tool it’s meant to be.
Conclusion
Editing large batches of images doesn’t have to feel like a chore. With a well-structured Lightroom workflow, you can turn even the most overwhelming batch of photos into a clean, consistent, and satisfying project. The key is to prepare thoughtfully, use Lightroom’s organizational tools wisely, and optimize the performance of both your system and your catalog.
To recap: Cull efficiently using flags, ratings, and smart import previews. Organize your images with Collections or Albums to simplify editing. Apply presets on import to ensure a unified look from the start. Leverage keyboard shortcuts and Auto-Advance for a smoother reviewing experience. Finally, optimize your hardware and catalog settings to keep Lightroom running fast and responsive.
These workflow tips are simple but powerful. They help you maintain the consistent quality your clients expect—without spending all night behind your screen.
Want to get even more out of your Lightroom edits? Head over to our next article and learn how to fine-tune your images and apply stunning color styles with precision.
Comments


About Neurapix
Neurapix is a German startup based in Göttingen. Founded in 2021, the company has developed an artificial intelligence that learns individual editing styles and applies them directly within Adobe Lightroom. This allows photographers to edit large volumes of photos in their personal style in a fraction of the time—saving them hours of work.


Copyright © 2025 Neurapix GmbH. All rights reserved.